 Essential Takeaways
- Sand aggregate works as a leveling course between the compacted gravel base and your pavers.
- A one-inch layer of sharp or concrete sand creates the foundation for an even paver surface.
- Compacting the road base in 2 to 3-inch lifts prevents settling and shifting later.
- Polymeric sand in the joints stops weed growth, ant infiltration, and washout during heavy rain.
- Rushing or skipping base prep is the most common cause of paver patio failure.
Six months after laying that paver patio, half the stones have sunk, the others tilt every which way, and weeds are creeping up through every joint. The problem almost always traces back to how the sand aggregate was prepared underneath. Get the sand layer right, and you have a flat, level paver patio that holds up for many years. Get it wrong, and you’ll be lifting and resetting pavers within a season.
How Sand Aggregate Works in a Paver Patio System
A dry-laid paver patio is built in layers. Compacted soil sits at the bottom, then a thick layer of crushed stone for drainage and structural support, then a thin bedding layer of sand aggregate, then your pavers, and finally jointing sand to seal everything up. Each layer has a job. The sand aggregate sits in the middle and acts as a leveling course, smoothing out small inconsistencies in the gravel base so each paver settles into a flat plane.
Without that sand layer, you’d be setting pavers directly on uneven crushed stone, making it nearly impossible to achieve a flat surface. Concrete sand and sharp sand are both common bedding choices because they compact firmly while still letting water drain through.
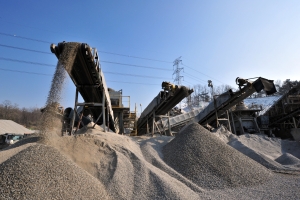
Compacting the Gravel Road Base
Before the sand ever goes down, the gravel base needs proper compaction. For most patios, you want about 4 to 6 inches of compacted aggregate over the soil, while driveways and other heavy-load areas need 8 to 12 inches. The base material is typically a graded crushed stone with fines mixed in, which packs into a dense, stable layer when properly compacted.
The mistake most DIYers make during paver base preparation is dumping the full depth at once and trying to compact it. That doesn’t work. You need to add the gravel in 2 to 3-inch lifts, running a vibrating plate compactor over each lift before adding the next. This builds density from the bottom up and prevents the slow settling that ruins patios after a year or two. If your soil is heavy clay, lay a geotextile fabric between the soil and the gravel so the base aggregate doesn’t migrate into the clay over time. Wear hearing protection when running the plate compactor, and follow the rental yard or manufacturer’s instructions for safe operation.
Spreading and Screeding the One-Inch Sand Layer
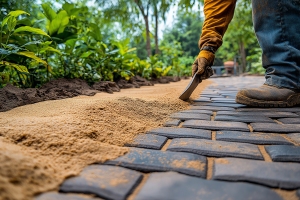 Once the gravel is fully compacted, spread a one-inch layer of sand aggregate across the surface. Most installers set 1-inch metal pipes or screed rails on top of the gravel as guides, which keeps the sand depth consistent across the whole patio.
Drag a long screed board across the rails to flatten the sand, shaving off high spots and filling in the lows. The goal is a flat plane at your finished slope. You want a slight pitch away from any structures so water drains off the patio. Do not walk on the sand once it’s screeded. You screed the bedding layer once and leave it undisturbed so it stays perfectly flat, and the plate compactor handles the final setting after the pavers go down. Footprints turn into depressions that telegraph through to the finished surface, so work from boards or from pavers you’ve already set.
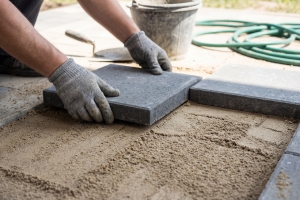
Setting Pavers Using Proper Leveling Techniques
Set pavers directly onto the screeded sand, using string lines as references for straight joints. Tap each one into place with a rubber mallet, checking with a spirit level every few rows to confirm the surface stays even and follows your drainage slope.
Once all pavers are down, run a plate compactor with a rubber pad over the entire surface. This seats the pavers into the bedding sand and tightens up the system before joint sand goes in. Skip this step, and you’ll get loose, shifting pavers within weeks.
Polymeric Sand for Long-Lasting Joints
Standard sand swept into joints washes out during the first heavy Florida rainstorm, letting weeds and ants take over. Polymeric sand solves both problems. It’s a mix of fine sand and polymer binders that hardens when activated with water. Install polymeric sand only when the patio surface and joints are completely dry, and check the forecast for at least 24 hours without rain so the polymers can cure properly.
Sweep it into the joints, brush off the excess, then mist the surface lightly according to the manufacturer’s instructions. The polymers cure into a semi-rigid bond that locks the sand in place. You get far fewer weeds, no ant hills, and joints that hold up to heavy summer downpours. Polymeric sand works in joints up to about 4 inches wide, so it covers most patio designs.
Maintenance That Keeps Your Patio Flat
A properly built sand-set patio needs very little upkeep, but a few routine checks pay off:
- Look for low spots or pooling water after heavy rain and address them early
- Top up polymeric sand in any joints where it has thinned out, then reactivate with water
- Lift and reset any individual pavers that shift, using fresh bedding sand underneath
Localized fixes are simple with a dry-laid system, which is one of the biggest advantages of sand-set construction over mortared installations.
Common DIY Mistakes With Sand Aggregate
- Skipping compaction or compacting the full gravel depth at once instead of in 2 to 3-inch lifts.
- Using too thin or too thick a bedding sand layer instead of a consistent one‑inch layer.
- Walking all over the screeded sand and setting pavers on top of footprints and ridges.
- Sweeping in regular play sand instead of polymeric sand, leading to weeds, ants, and washed‑out joints.
Build Your Patio With Quality Sand From Barclay Earth Depot
The right sand aggregate makes the difference between a long-lasting paver patio and one that needs constant attention. Barclay Earth Depot supplies the bedding and joint sand homeowners across Florida need for DIY patio construction that gets done once and gets done right. You get clean, properly graded aggregate materials and fast bulk delivery from a team that knows what holds up in Florida soil and weather. Contact us today at (941) WE-DIG-IT or online to order the sand aggregate your paver patio project needs.